

Welcome to the world of Redux! If you’re just starting out with state management or seeking clarity on Redux’s role in React applications, fear not — you’re in the perfect spot. I’m no Redux guru myself; I’m simply someone who’s recently grasped the basic structure of Redux and is eager to share the experience with you. In this blog post, we’ll walk through building a straightforward counter app using React, Redux, and NextJS 14. By the time we wrap up, you’ll learn the basic fundamentals of Redux, understand its integration within NextJS projects for scalable solutions, and also get to grips with setting up a project directory that meets industry standards.
What is Redux?
Redux is a standalone state container or state management library that can be used with any JavaScript framework or library. It helps you manage the state of your application in a predictable way by using a single source of truth, known as the store. Actions trigger changes to the store, which are then handled by reducers to update the state.
When should Redux be used?
From the diagram below, let’s consider a scenario where you’re building a counter feature within a complex component tree.
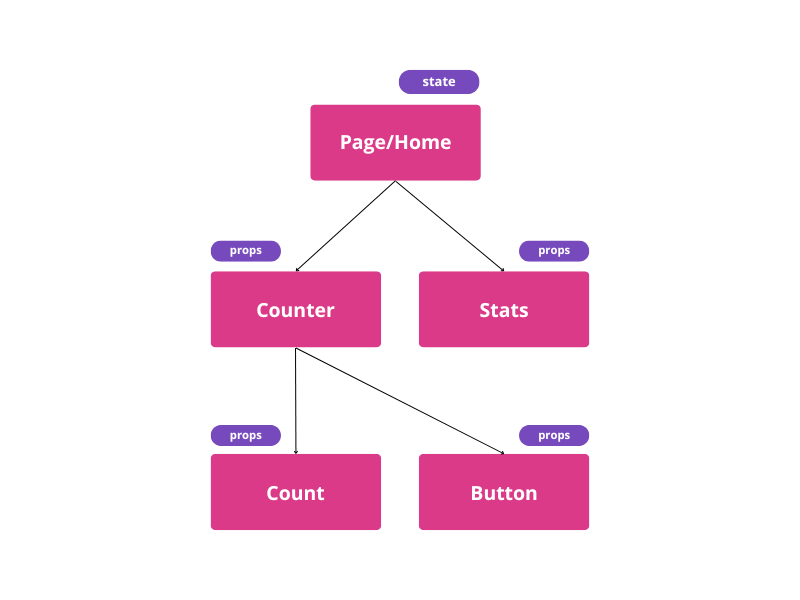
The root component, Page or Home, calls upon both the Counter and Stats components. If you were to manage state within the Counter component, the Stats component wouldn’t be able to access it directly. The traditional solution would be to lift the state up to their common ancestor and pass it down as props, but this becomes cumbersome and messy, especially as the application grows.
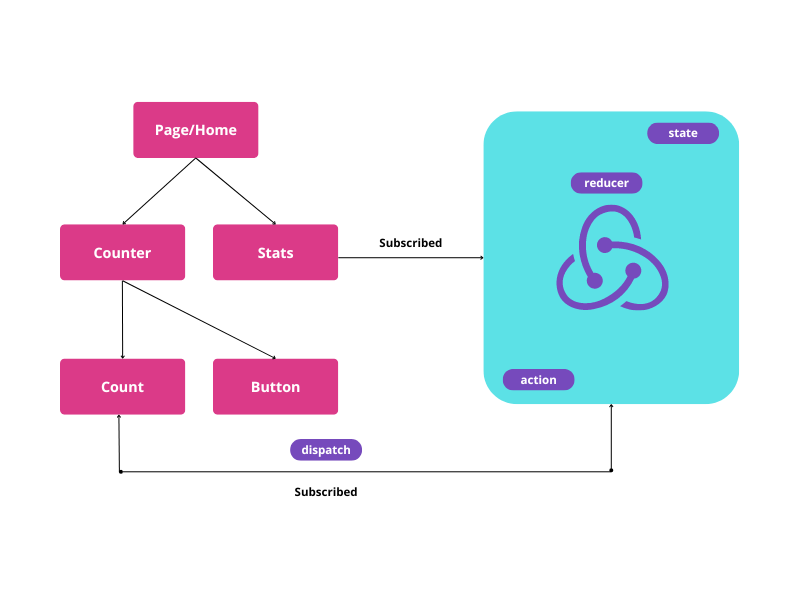
To solve the issue Redux offers a neat solution by decoupling (reducing interdependence between the different components) the state from the component hierarchy and placing it in a separate store. Components can then subscribe to the store, much like signing up for a newsletter, and receive updates instantly whenever the state changes.
How does redux work?
Imagine a Button component in your UI. When a user interacts with this button, an action is sent to Redux. In Redux terminology, this is known as dispatching an action, which triggers state changes through reducers. This process ensures that state management is both scalable and maintainable.
Still confusing, right? No Worries! Let’s delve into the code for a clearer understanding!
Setting Up Your Environment
Before diving into the code, make sure you have NodeJS installed on your machine. Once that’s set up, you can clone the GitHub repository containing the counter app project.
GitHub - Faheem2k19/learn-redux: Redux for beginners
Navigate to the project directory and run npm install to install all the necessary dependencies, including react-redux and @reduxjs/toolkit.
Project Requirements
- NodeJS
- NextJs 14
- JavaScript
- Tailwindcss
- react-redux
- @reactjs/toolkit
Exploring the Project Structure
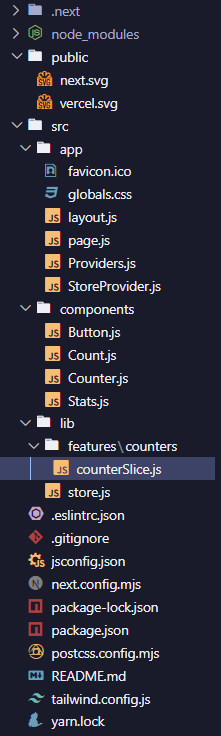
The project is structured in a way that is typical for a NextJS application, with a few additions for Redux:
Before delving into the project details, I want to point out that you’ll see ‘use client’; at the beginning of many components in our code. This is because, in NextJS, you now need to specify it to separate client-side and server-side modules.
Now, let’s start with the files in the @/components folder.
Count.js
The count component receives the count prop, which display the count number upon pressing the increment and decrement buttons.
'use client';

export default function Count({ count }) {
    return <div className="text-2xl font-bold">{count}</div>
}
Button.js
'use client';

export function Button({ type, handler, children }) {

    const style =
    type === "danger"
        ? "bg-red-500 text-white px-3 py-2 rounded"
        : "bg-blue-500 text-white px-3 py-2 rounded";

    return (
        <button
            className={style}
            onClick={handler}
        >
            {children}
        </button>
    );
}
The button component takes three props: type, handler, and children.
- The type prop is used to determine the styling of the button. If the type is set to “danger”, the button will have a red background color; otherwise, it will have a blue background color.
- The handler prop is a function that will be called when the button is clicked.
- The children prop represents the content of the button.
Within the component, a style variable is set using a ternary operator that evaluates the type property. If type equals “danger,” style is assigned “bg-red-500”; otherwise, it receives “bg-blue-500.”
That’s the overall process of this Button component. It defines a reusable button component that can be used throughout our application with different styles and click handlers.
Stats.js
This component, named Stats, receives the totalCount prop, which is used to display a statistics card with the total count.
'use client';

export default function Stats({ totalCount }) {
    return (
        <div className="p-4 h-40 flex flex-col items-center justify-center space-y-5 bg-white rounded shadow">
            <div className="text-2xl font-bold">Total count: {totalCount}</div>
        </div>
    );
}
Counter.js
'use client';

import { Button } from "./Button";
import Count from "./Count";

export default function Counter({ count, onIncrement, onDecrement }) {

    return (
        <div className="p-4 h-auto flex flex-col items-center justify-center space-y-5 bg-white rounded shadow">
            <Count count={count} />
            <div className="flex space-x-5">
                <Button type="danger" handler={onDecrement}>Decrement</Button>
                <Button handler={onIncrement}>Increment</Button>
            </div>
        </div>

    );
}
Here the Counter component takes in three props: count, onIncrement, and onDecrement. It renders a counter UI with buttons to increment and decrement the count. The component imports two components, Button and Count, from separate files using the import statement.
The count prop is passed to the Count component to display the current count value. On the other hand, the onIncrement and onDecrement props are passed as the handler props to the Button component, which means it will be called when the button is clicked to increment or decrement the count. Basically, the Counter component is responsible for rendering a counter UI and handling the increment and decrement functionality based on the provided props.
Now that we’ve finished with the components, let’s proceed to the most crucial part of REDUX — slicing some pizza in a pizza store!
Understanding Redux with the Counter Feature
Let’s take a closer look at the @lib/features/counters/counterSlice.js file. This is where the Redux magic happens for our counter feature. The slice contains the initial state, action creators, and the reducer function. The reducer listens for dispatched actions and updates the state accordingly.
counterSlice.js
import { createSlice } from '@reduxjs/toolkit'; // import the createSlice function from the @reduxjs/toolkit package.

const initialState = [
    { id: 1, value: 0 },
    { id: 2, value: 0 },
]; // define the initial state of the counter slice.

const counterSlice = createSlice({
    name: 'counters',
    initialState,
    reducers: {
        increment: (state, action) => {
          const counterIndex = state.findIndex(
            (counter) => counter.id === action.payload
        );

        state[counterIndex].value++;
        },

        decrement: (state, action) => {
          const counterIndex = state.findIndex(
            (counter) => counter.id === action.payload
        );

        state[counterIndex].value--;
        }
    }
});

export default counterSlice.reducer; // export the reducer function from the slice file to use in the store configuration.

export const { increment, decrement } = counterSlice.actions; // export the action creators from the slice file to use in the components.
In this code snippet, we defined the initial state of the counter slice. The initial state is an array of objects, where each object represents a counter with an id and a value. In this case, there are two counters with initial values set to 0.
After that, the createSlice function to create a counter slice. The createSlice function takes an object as an argument with the following properties:
- name: Specifies the name of the slice, which is ‘counters’ in this case.
- initialState: Specifies the initial state of the slice.
- reducers: Specifies an object with reducer functions. In this case, there are two reducer functions: increment and decrement. These reducer functions take the current state and an action as arguments. The action payload is used to find the index of the counter object in the state array, and then the value of that counter is incremented or decremented accordingly.
And lastly, exports the reducer function from the counter slice file, which will be used in the store configuration. It also exports the action creators (increment and decrement) from the counter slice file, which will be used in the components to dispatch the corresponding actions.
Store.js
This file shows the process of configuring the Redux store in a JavaScript application using the @reduxjs/toolkit library.
import { configureStore } from '@reduxjs/toolkit';
import countersReducer from '@/lib/features/counters/counterSlice';

const store = configureStore({
    reducer: {
        counters: countersReducer,
    },
});

export default store;
Here we are importing configureStore function from @reduxjs/toolkit package to create the Redux store and also, importing a reducer function called countersReducer from counterSlice.js file that handles the state updates for the counters feature in the application.
Configuring the Redux store:
The configureStore function is called with an object as its argument.
Inside the object, the reducer property is set to an object that maps the state slice names to their corresponding reducer functions. In this case, the counters state slice is associated with the countersReducer function.
By following these steps, the code sets up the Redux store with the specified reducer, allowing the application to manage and update the state using Redux principles.
Moving on to the final segment of our project, having established the Redux workflow, our main task is to integrate the necessary components into the main page component to bring the client-side experience to life.
Page.js
'use client';

import { useDispatch, useSelector } from "react-redux";
import Counter from "@/components/Counter";
import Stats from "@/components/Stats";
import { decrement, increment } from "@/lib/features/counters/counterSlice";

export default function Home() {

  const dispatch = useDispatch(); // get the dispatch function from the useDispatch hook.

  const counters = useSelector((state) => state.counters); // get the counters state from the store using the useSelector hook.

  const totalCount = counters.reduce(
    (sum, current) => sum + current.value,
    0
  ); // calculate the total count of all counters.

  const handleIncrement = (id) => {
    dispatch(increment(id));
  }; // define a function to dispatch the increment action.

  const handleDecrement = (id) => {
    dispatch(decrement(id));
  } // define a function to dispatch the decrement action.

  return (
    <main>
      <div className="w-screen h-screen p-10 bg-gray-100 text-slate-700"
      >
        <h1 className="max-w-md mx-auto text-center text-2xl font-bold">
          Counter App
        </h1>
        <div className="max-w-md mx-auto mt-10 space-y-5">
          <div className="space-y-5">
            {counters.map((counter) => (
              <Counter
                count={counter.value}
                key={counter.id}
                counter={counter}
                onIncrement={() => handleIncrement(counter.id)}
                onDecrement={() => handleDecrement(counter.id)}
              />
            ))}
          </div>
          <Stats totalCount={totalCount} />
        </div>
      </div>
    </main>
  );
}
The page.js file in the @/app directory sets up the main page of the Counter App, connects to the Redux store using useDispatch and useSelector hooks, calculates the total count of all counters, and provides functions to handle incrementing and decrementing individual counters.
Integrating Redux with NextJS
We’ve nearly completed the necessary configurations to utilize Redux in our application. However, there’s an additional step to consider. If you’re developing an application with NextJS and wish to incorporate Redux, the conventional approach would be to wrap the RootLayout component’s children with <Provider /> from the react-redux library. Yet, this method leads to an error.
To resolve this, you should adopt the following approach:
Add a new file called StoreProvider.js under your app folder
'use client';

import { Provider } from 'react-redux';
import store from '@/lib/store';

export default function StoreProvider({ children }) {
    return <Provider store={store}> {children} </Provider>
}
Add another file called Providers.js under your app folder and implement StoreProvider
'use client';

import StoreProvider from "./StoreProvider";

export default function Providers({ children }) {
    return (
        <StoreProvider>
            {children}
        </StoreProvider>
    );
}
Now finally we can implement Providers in our layout.js file below like this:
import { Inter } from "next/font/google";
import "./globals.css";
import Providers from "./Providers";

const inter = Inter({ subsets: ["latin"] });

export const metadata = {
  title: "Create Next App",
  description: "Generated by create next app",
};

export default function RootLayout({ children }) {
  return (
    <html lang="en">
      <body className={inter.className}>
        <Providers>
          {children}
        </Providers>
      </body>
    </html>
  );
}
Congratulations! You are now prepared to execute the project on your local machine.
Happy Coding!
Credits
- Learn with Sumit — LWS — Bangladesh — YouTube . I’ve learned the basics of Redux from his crash course. The code I’ve written to build the project and the diagrams I’ve created are mostly derived from his tutorial video. If you’re from Bangladesh or understand Bengali language, I would strongly recommend his Redux crash course before diving deeper into Redux.
- Ahmet Firat Keler for offering a solution to wrap redux in NextJS framework.
Want to learn design patterns of JavaScript? consider exploring the book titled “Learning JavaScript Design Patterns.” It serves as a comprehensive guide for both JavaScript and React developers.
Learning JavaScript Design Patterns: A JavaScript and React Developer's Guide
I hope this article has been helpful to you. Thank you for taking the time to read it.
Get an email whenever Asiful Alam Fahim publishes.
If you’re interested in more in-depth and technical write-ups like this one, be sure to follow me on Medium. And for all things related to startups, business, or web development, connect with me on LinkedIn.
Ready to design and develop your custom website? Please don’t hesitate to contact me! I’m always here to answer your questions and help bring your vision to life. To keep the inspiration flowing, check out the articles I’ve written below. Together, let’s continue to grow and expand our knowledge!
Related Posts
- Why I Love DataCamp and You Should Too | by Asiful Alam Fahim | Technology Hits | Medium
- Power of Next.js Server Components in React Development | by Asiful Alam Fahim | JavaScript in Plain English (medium.com)
- Top 3 CSS Frameworks for Frontend Developers | by Asiful Alam Fahim | JavaScript in Plain English (medium.com)
In Plain English 🚀
Thank you for being a part of the In Plain English community! Before you go:
- Be sure to clap and follow the writer ️👏️️
- Follow us: X | LinkedIn | YouTube | Discord | Newsletter
- Visit our other platforms: Stackademic | CoFeed | Venture | Cubed
- More content at PlainEnglish.io
React Redux for Absolute Beginners: Understanding State Management with a Simple Counter App was originally published in JavaScript in Plain English on Medium, where people are continuing the conversation by highlighting and responding to this story.